 Click Here to download User Guide
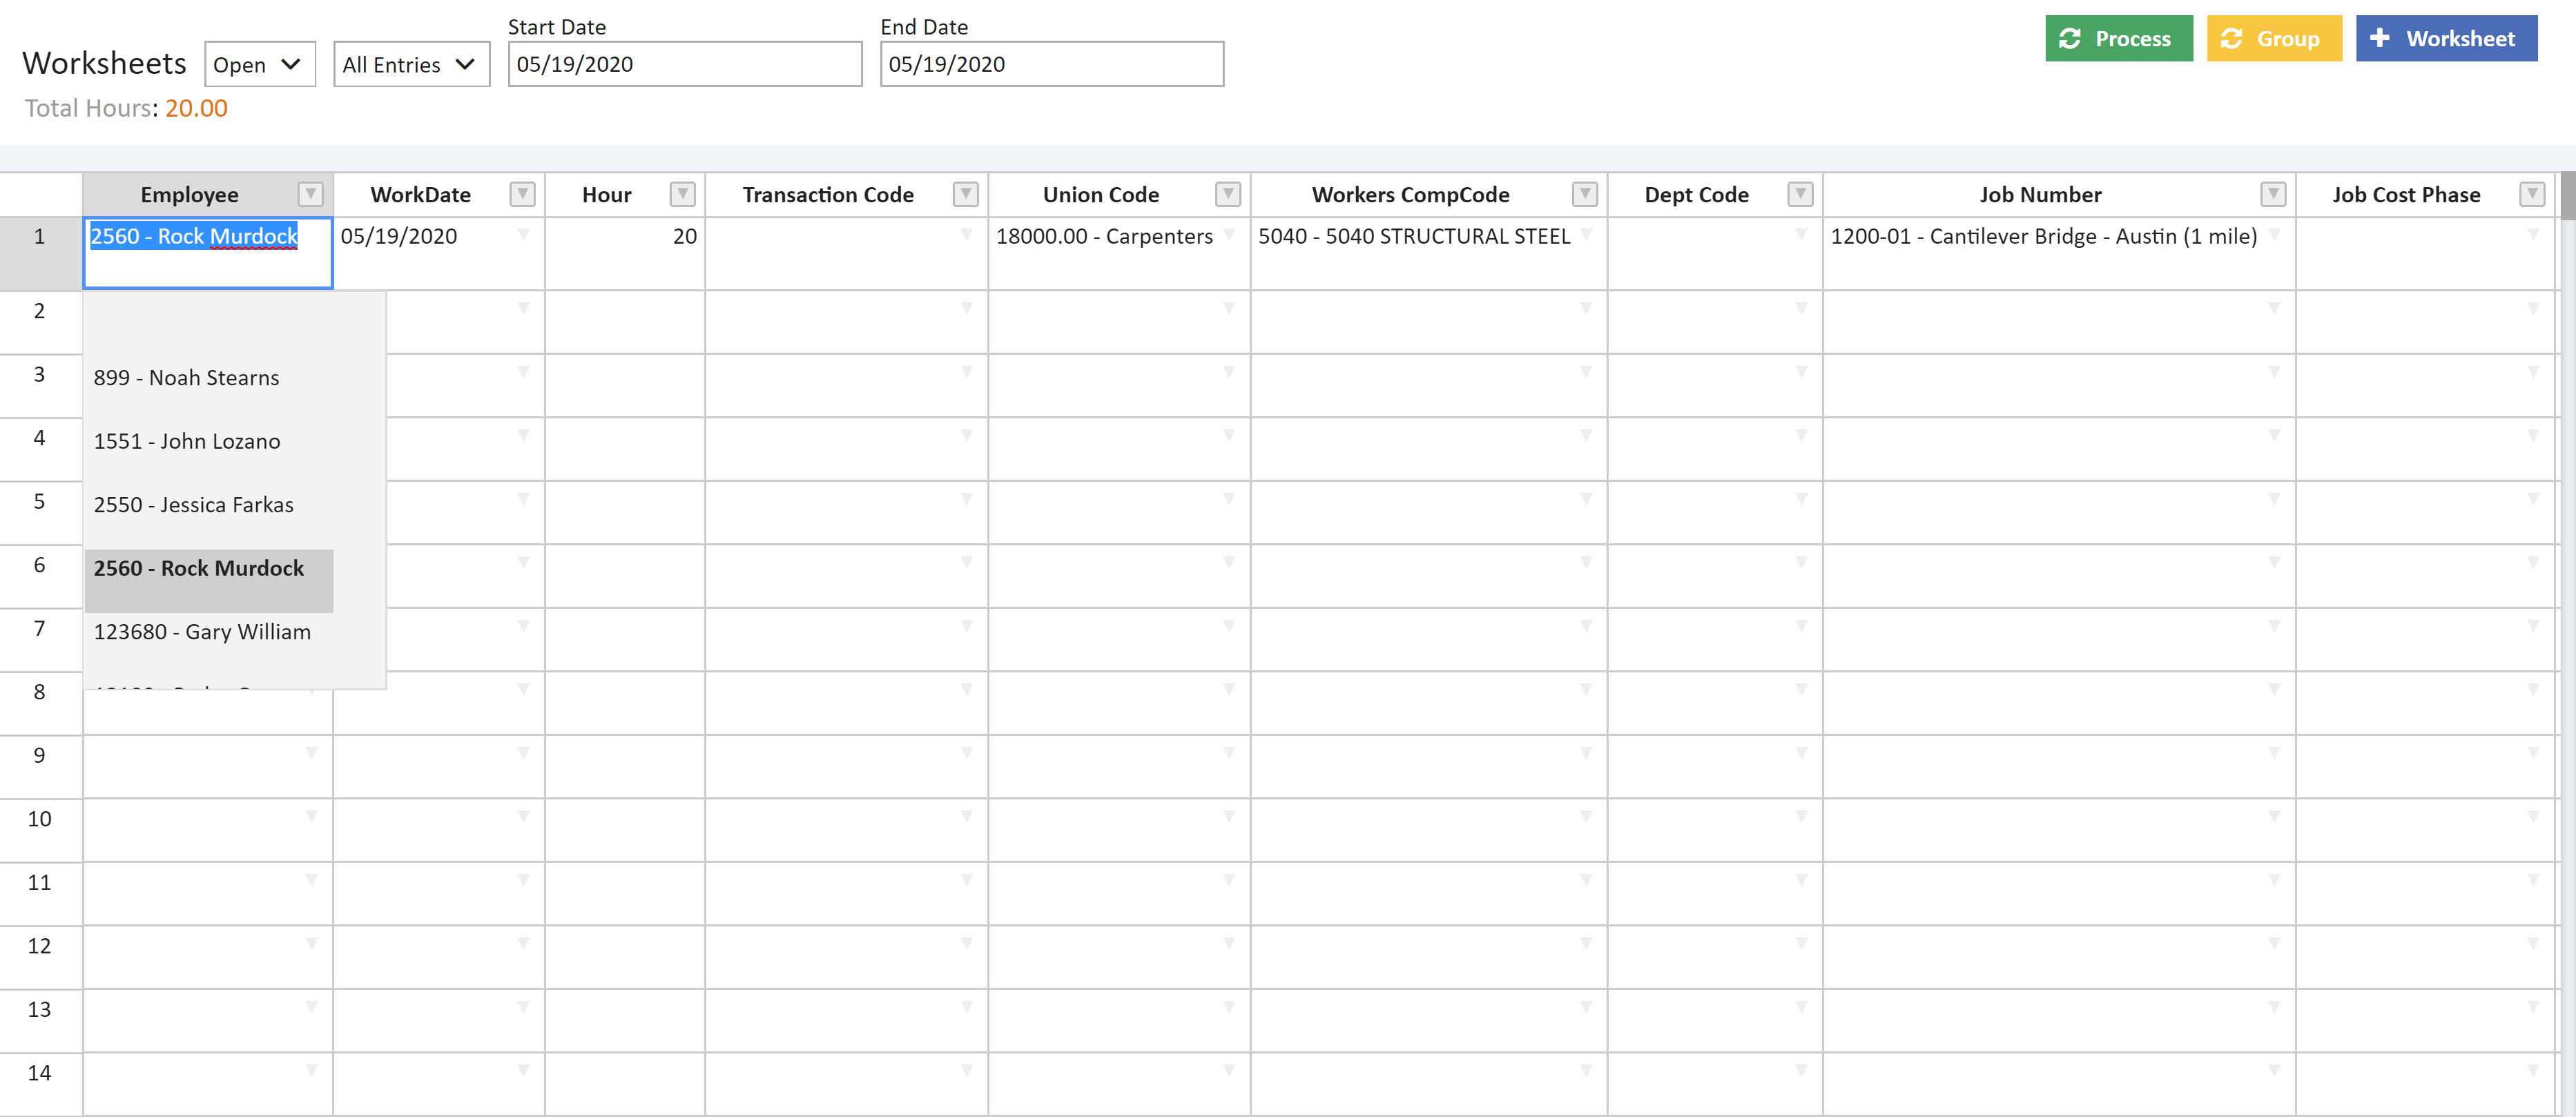
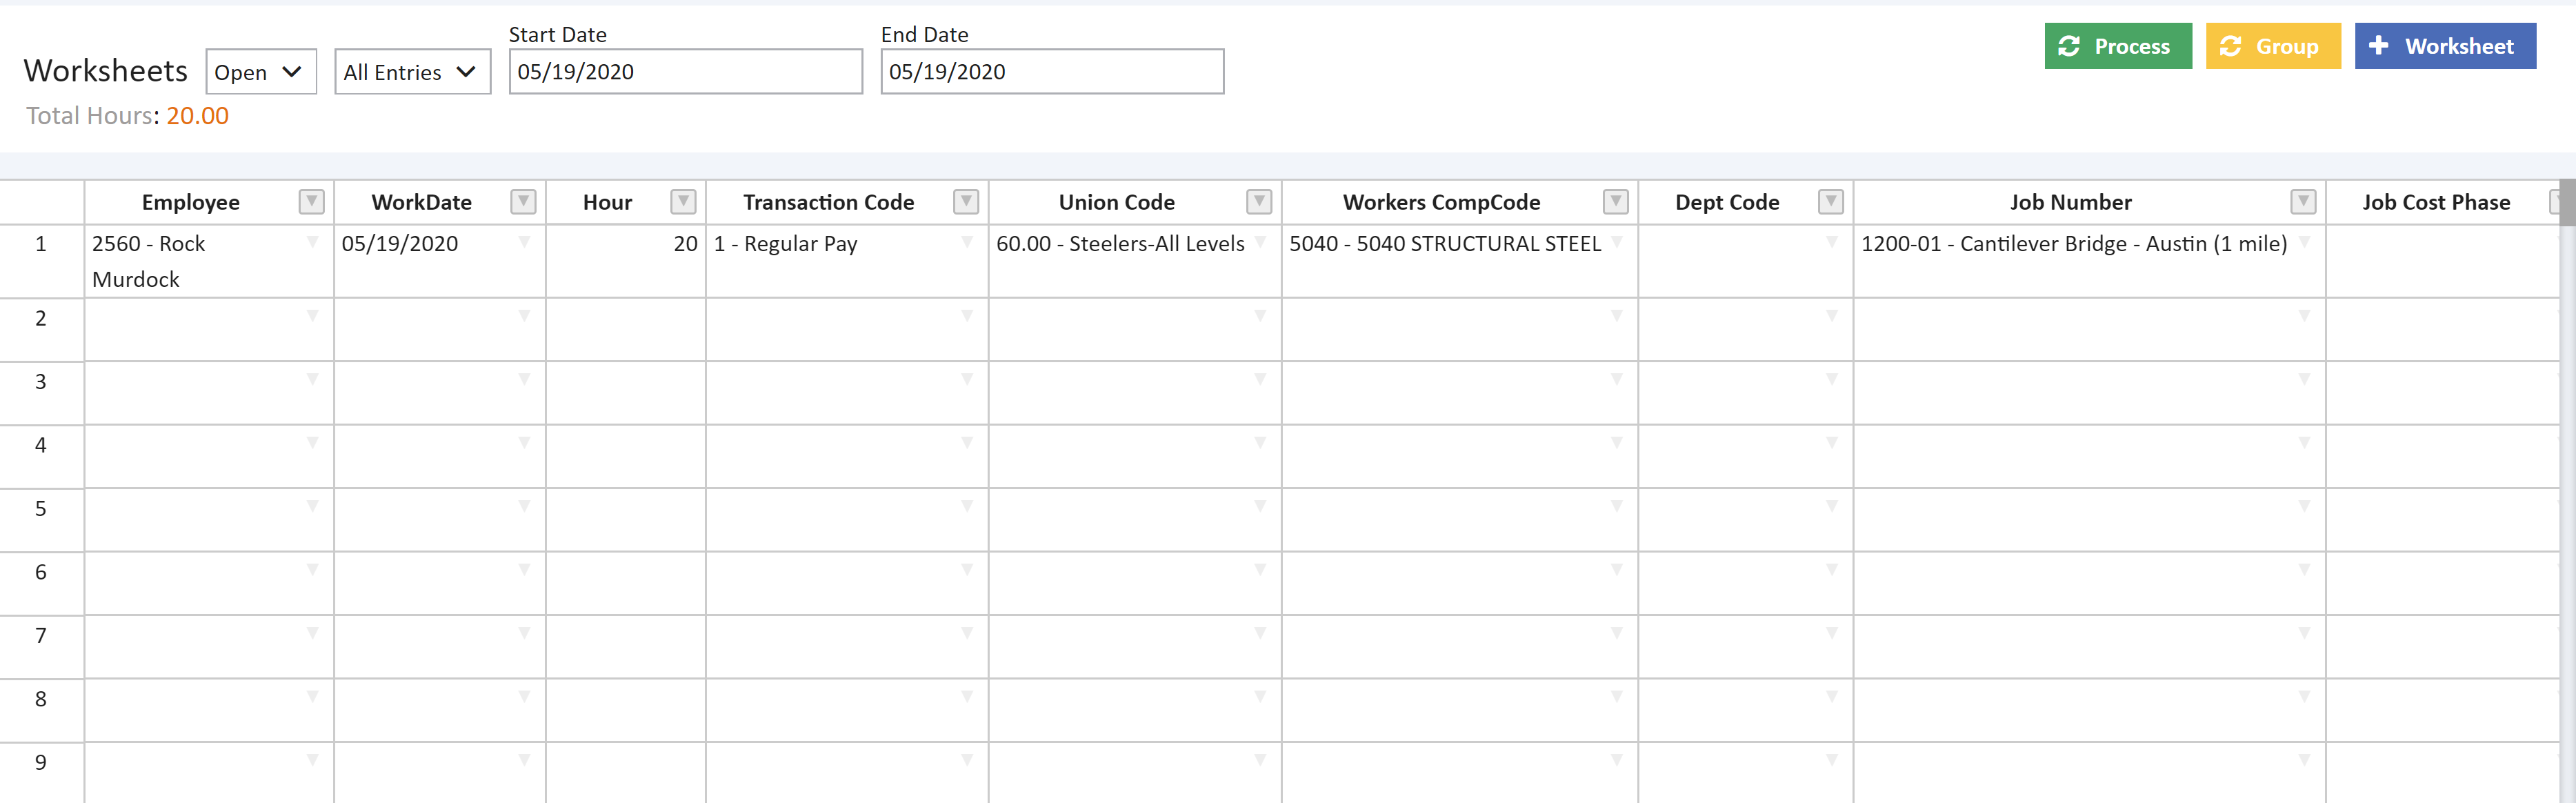
The Time Card Worksheet Screen is presented to you in an excel style and has several features that should make the data entry of time cards easier and faster. This screen allows multiple users into the screen at the same time and each transaction that a user makes is recorded with the user's ID. Entering new time card records can be easily done by entering values across the screen in each cell. Field values in each cell can be selected using the drop down (by clicking the arrow in the right corner of each cell). Reviewing the time card records is easy when you filter, group the records on any of the desired fields. For instance, on clicking the drop down from Employee cell employee names will be listed from which we can select.
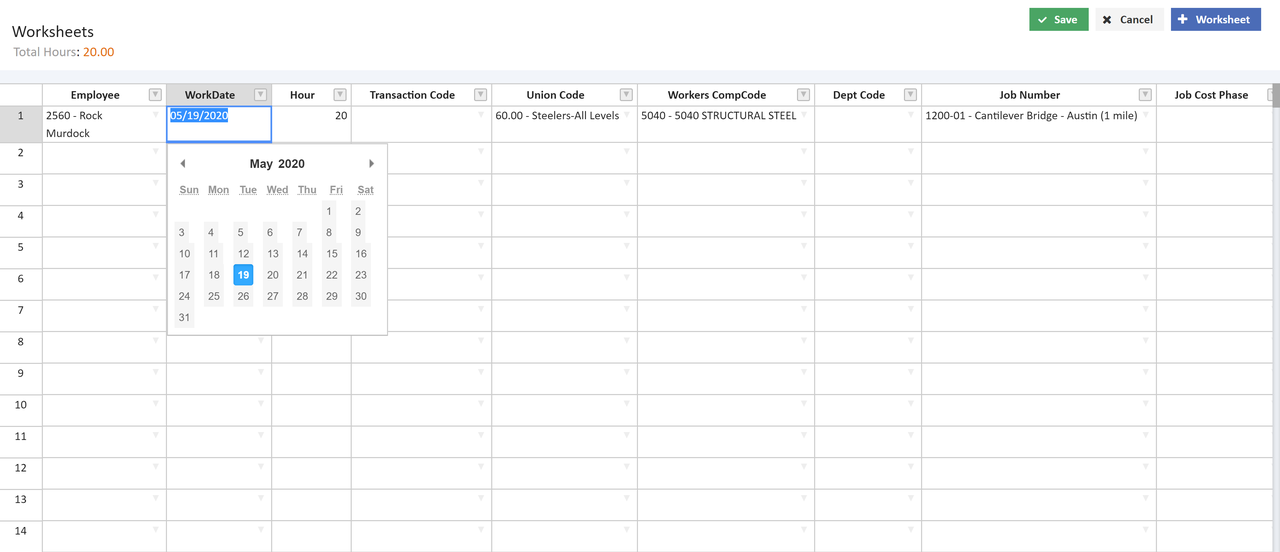
- On clicking the work date field, drop down arrow a calendar will be displayed from which the date can be picked.
- On clicking the Transaction Code field, drop down arrow the available transaction codes are selected from which we can pick the type of the transaction code.
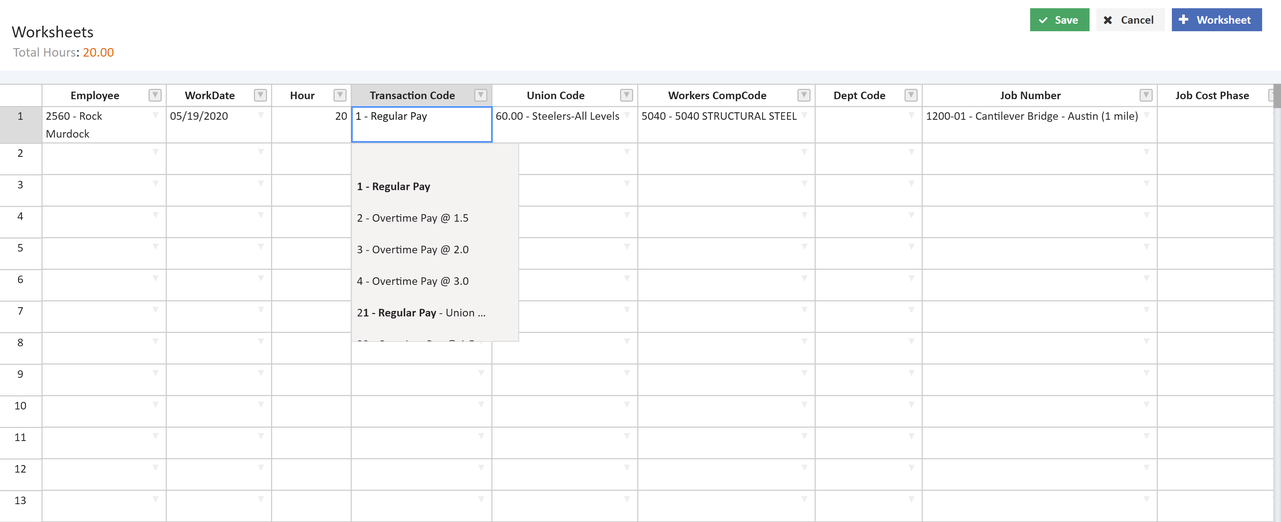
Similarly all the fields can be selected using the drop down in each cell to fill the values. The user can also type the values in the cell.
Navigating the Screen
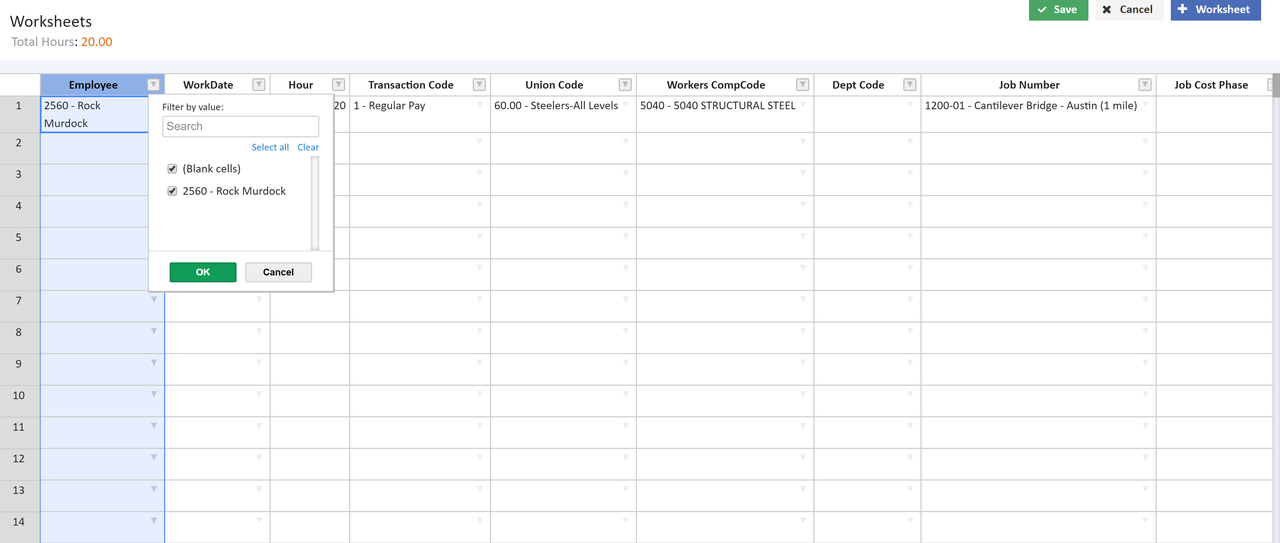
- Filtering – Click on the column header to view the filters available for each field. The column can be filtered by value by entering the values in the search box. The checkbox next to each value can be checked and clicking on OK button will display all the timecard records of all the checked values. Select all option in the filter box will allow the user to select all the available values. Clear option is used to clear all the selected values. Cancel button is used to close the filter pop-up. The screen below shows the filter pop-up.
|
The timecard worksheet records can be filtered using the fields available at the top of the screen. On the clicking the first field will list two options, Open and Processed. On clicking open option, the timecard worksheet records which are added or records pushed from AB Timeclock which are not yet processed will be displayed. On clicking the processed option, the records which are processed for a specific payroll will be displayed.
|
|
The next field is used to filter records using two options. My Entries will display only the timecard worksheet records added by the person who is logged in. All Entries will display all the available timecard worksheet records between the dates mentioned in Start Date and End Date fields.
|
|
Start Date and End Date fields are used to display the records between the specified dates. The timecard worksheet screen will display the records only between the dates mentioned in the start date and end date fields. For example, the screen below displays the timecard worksheet records from the dates (05/05/2020 - 05/06/2020) and the open entries which are not processed.
|
Time Card Worksheet Buttons
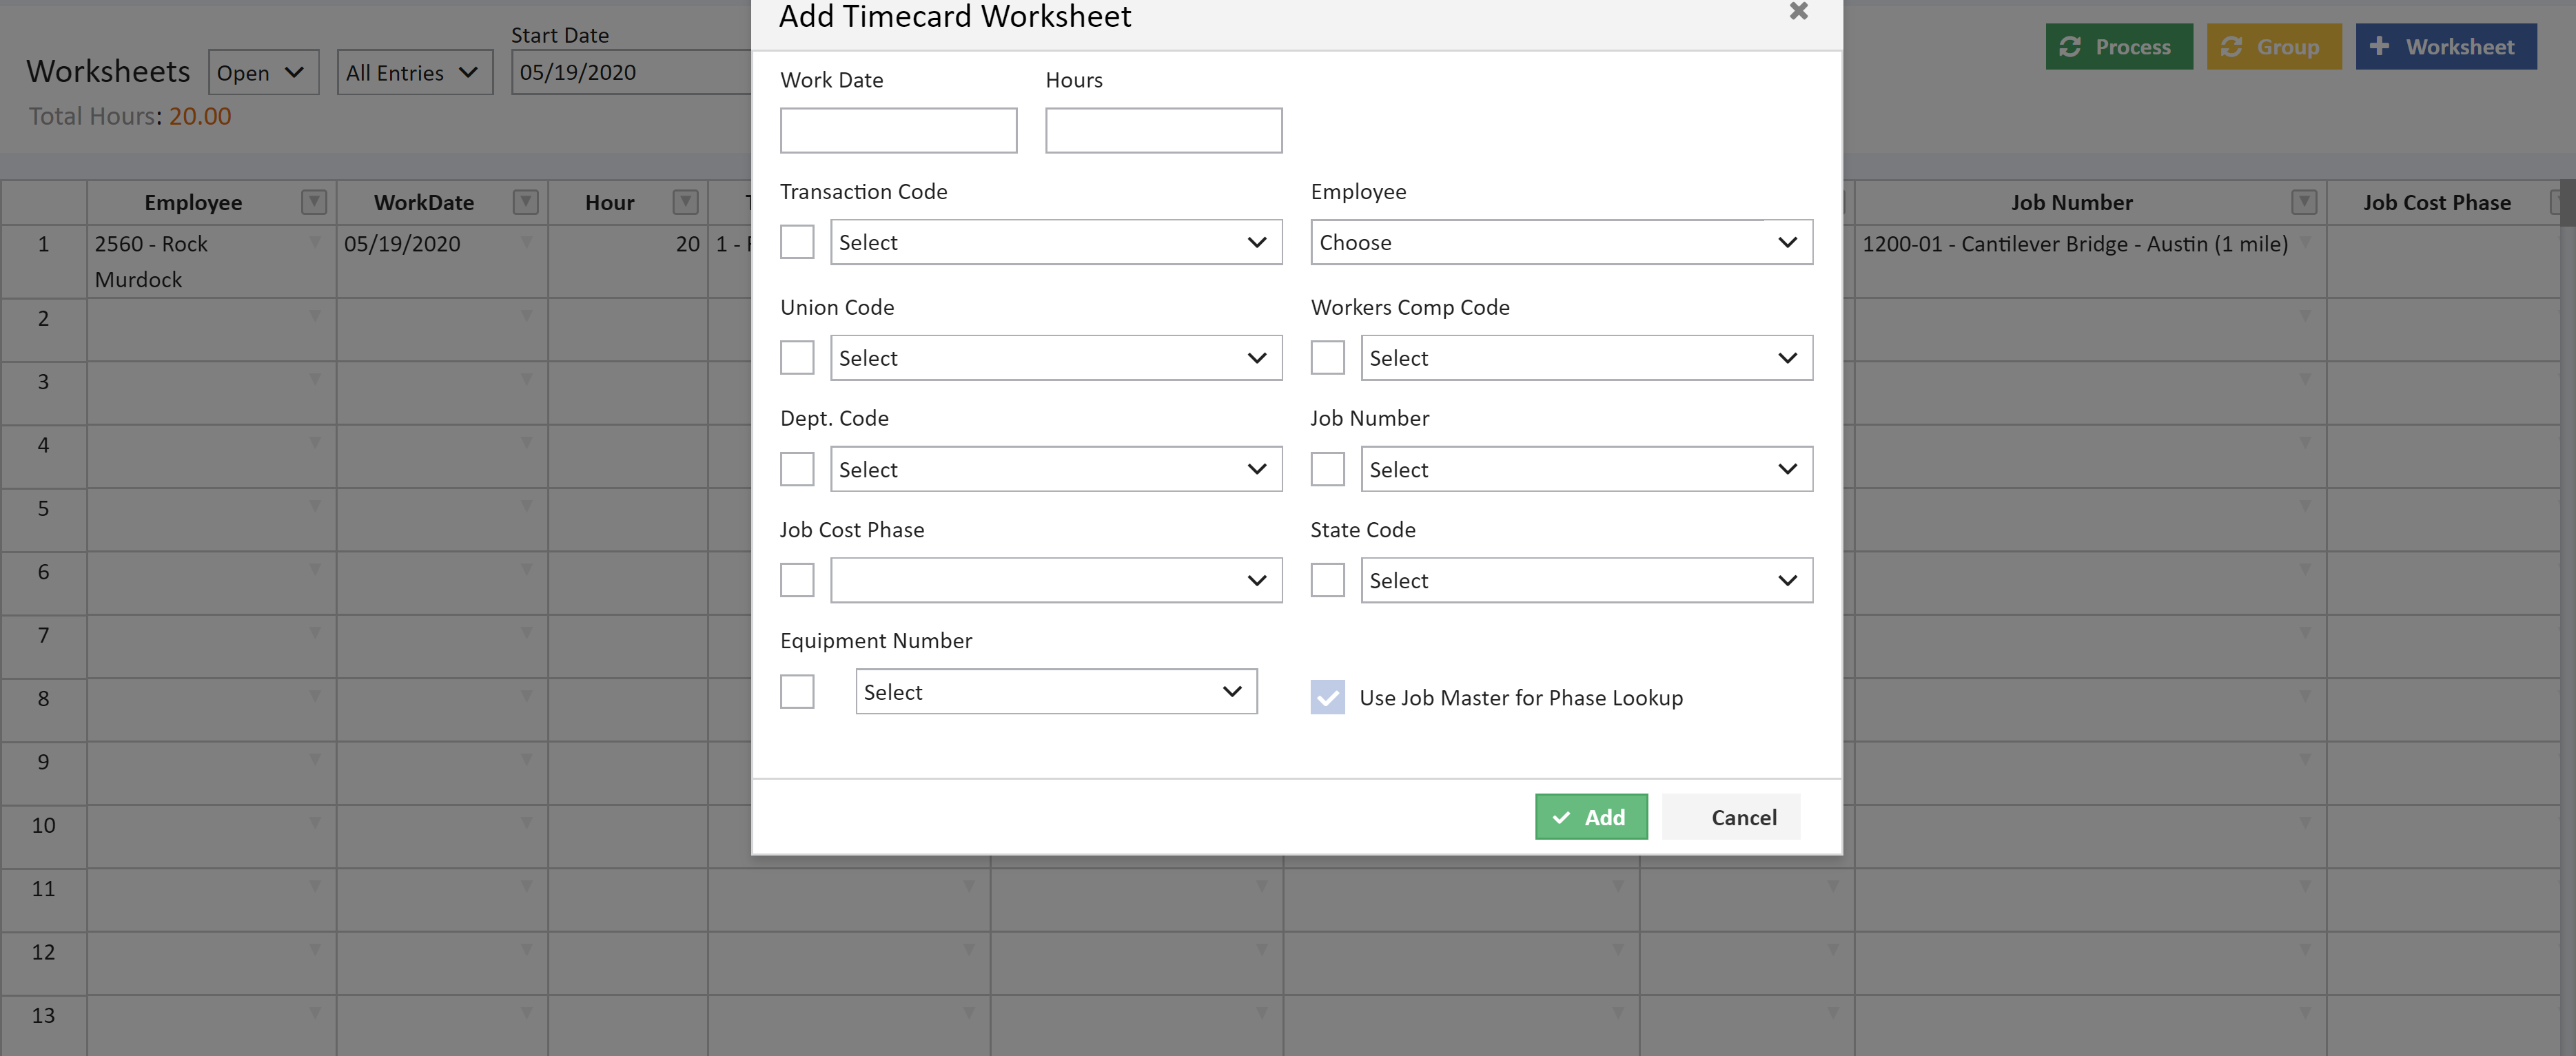
- Add Worksheet – This option is used to create a new record. The Add Timecard Worksheet contains all the fields available in timecard worksheet like workdate, hours, transaction code, Employee, union code, workers comp code, Dept. code, Job Number, Job cost phase, State code, equipment number. A checkbox is available to select Job master for phase lookup. When this option is check the phase list will be displayed from the job master. Below screen displays the Add worksheet. On filling the values in all the field and clicking on Add button a new timecard worksheet entry will be created. On clicking cancel the pop-up will be closed and redirected to timecard worksheet screen.
|
Save - This option is used to save the entered timecard worksheet records. On clicking on save button a confirmation pop-up will be displayed, clicking on yes will save the changes and clicking on no will redirect to the timecard worksheet screen and changes will not be saved.
|
|
Cancel - This option will redirect back to the timecard worksheet screen without any changes done to the records. On clicking on cancel button a warning pop-up will be displayed, clicking on ok will redirect back to the timecard worksheet screen without any changes done to the records and clicking on cancel will retain in the same screen.
|
|
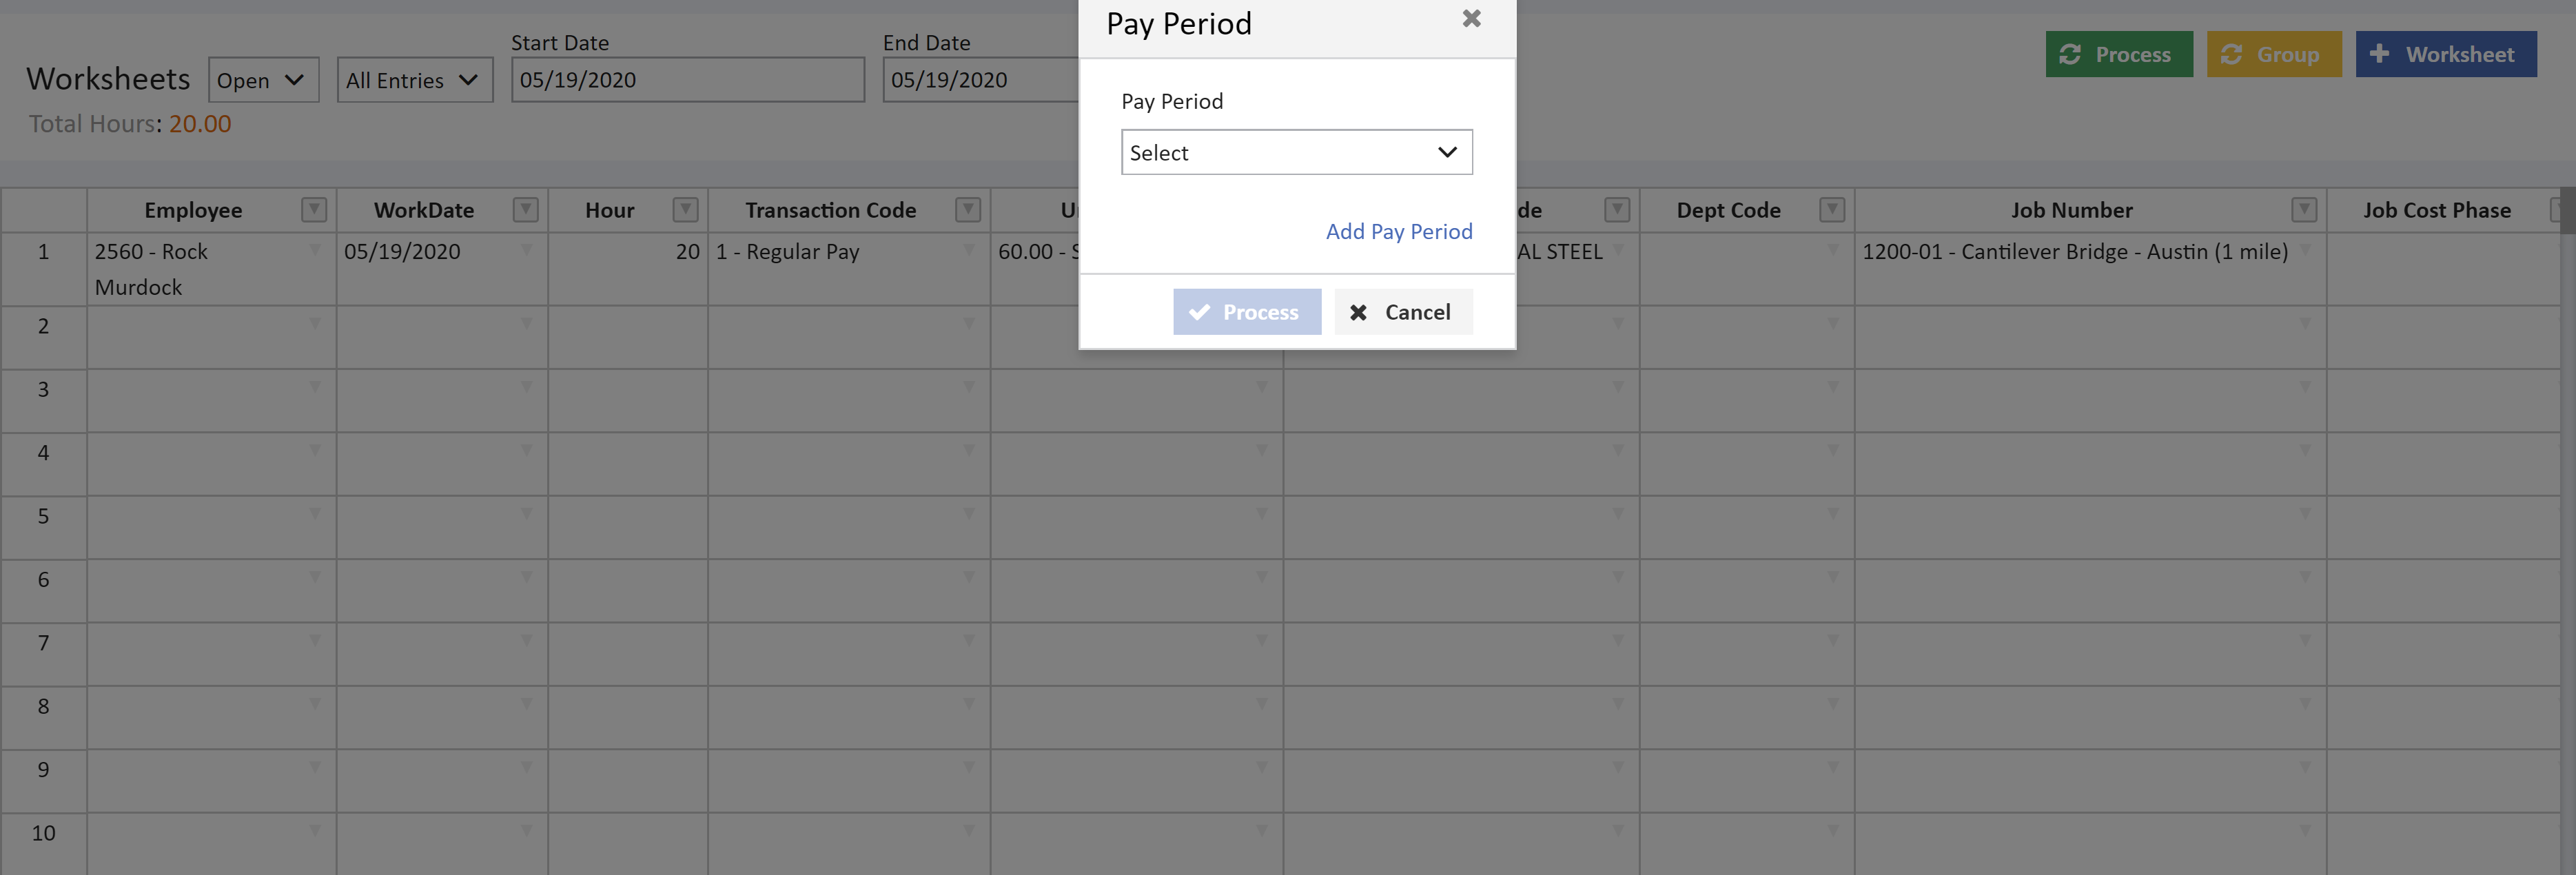
Process - This option allows to process the timecards once the timecards records are saved. On clicking the Process Button, a pop-up screen asks for the pay period. On clicking the pay period value drop down the user can selected the existing pay period or add a new pay period by clicking Add Pay Period. Add Pay period button will ask to select the Begin data and end date.
|
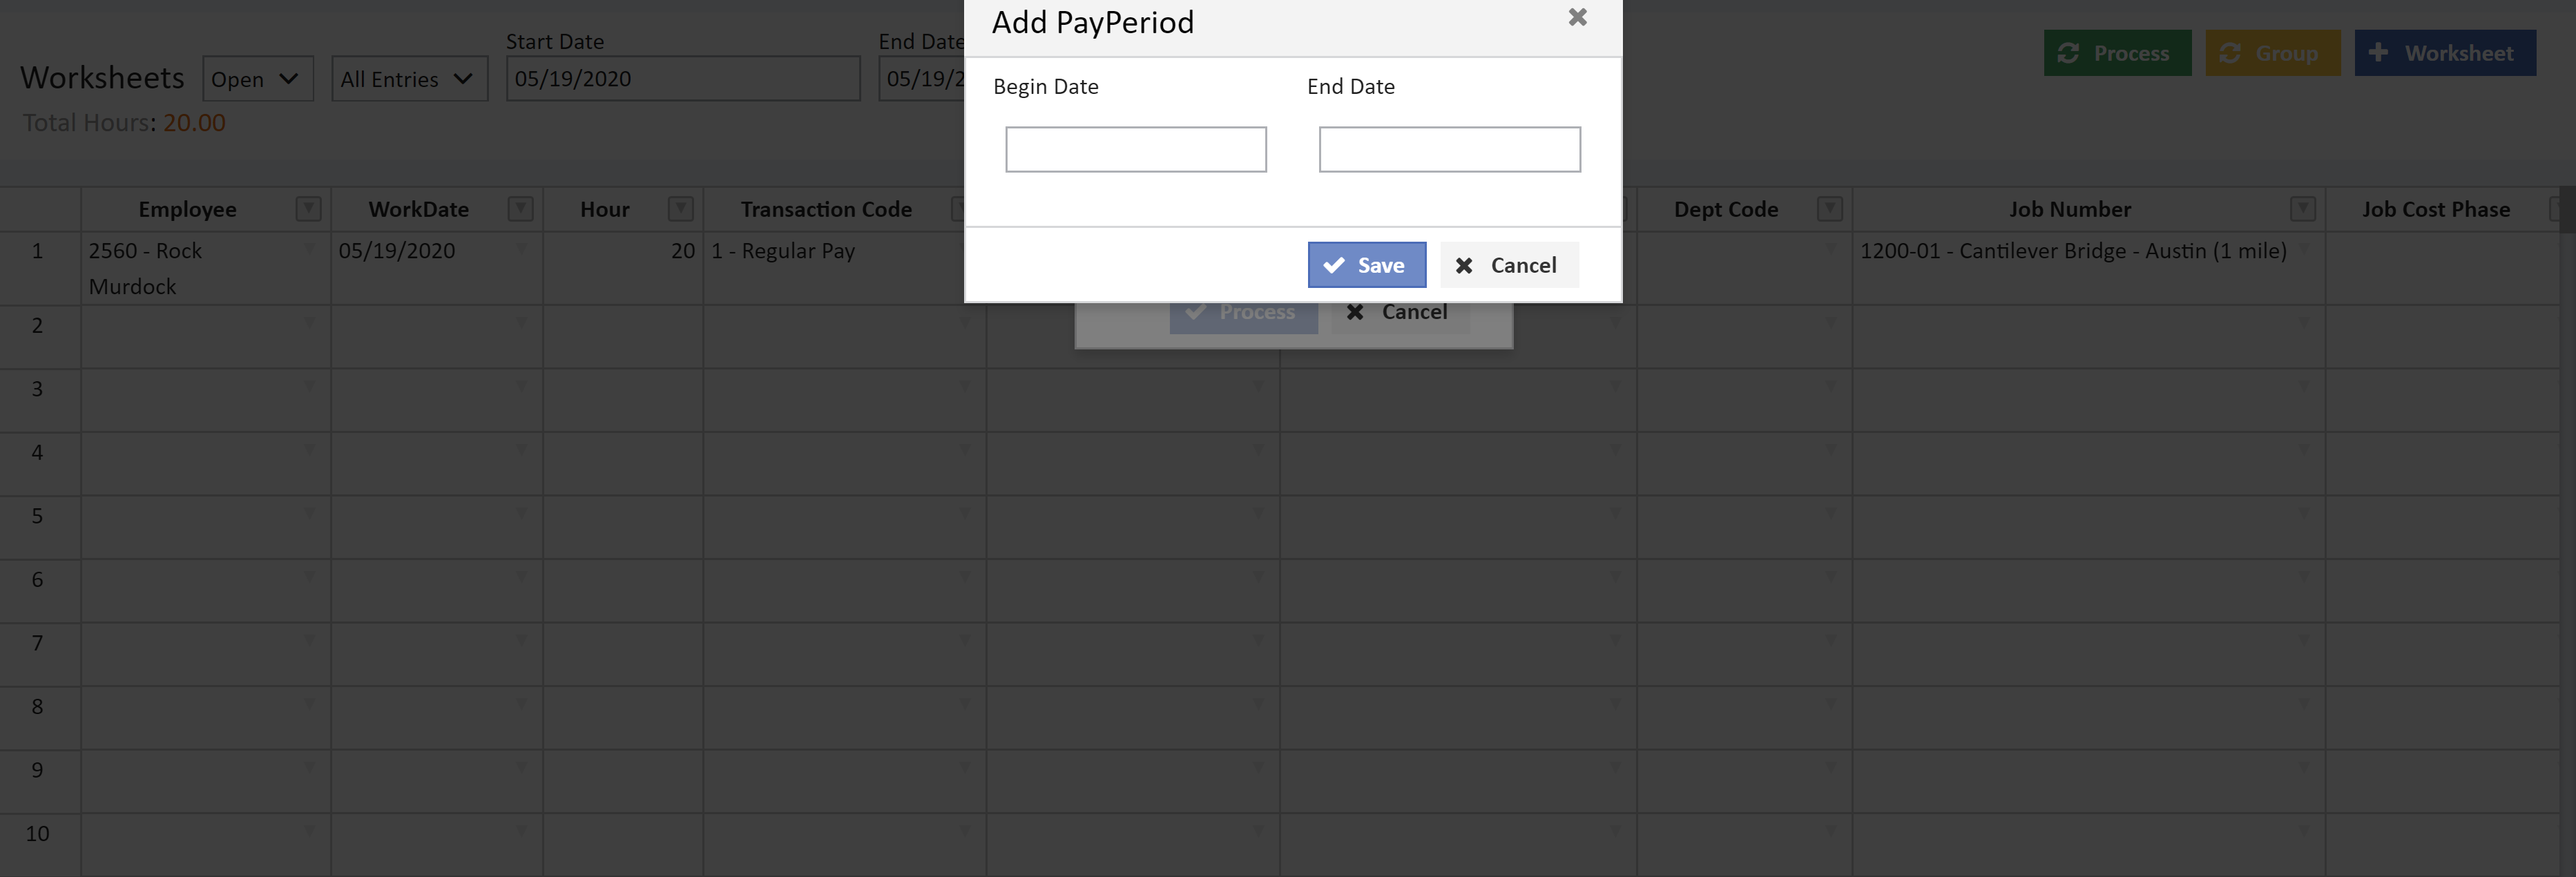
- Add Pay period button will ask to select the Begin data and end date. On clicking Begin date, End date field a calendar will pop-up from which dates can be selected and on clicking save new pay period will be added. If end date is not selected, the system will directly select the date seven days from the begin date.
-
After adding or selecting the pay period, click on Process button if there are no process worksheets for the selected pay period an error will be displayed. If the timecard worksheets are present for the selected pay period , all the records created will be displayed and on clicking yes the timecards will be processed and moved to Submit Payroll page.
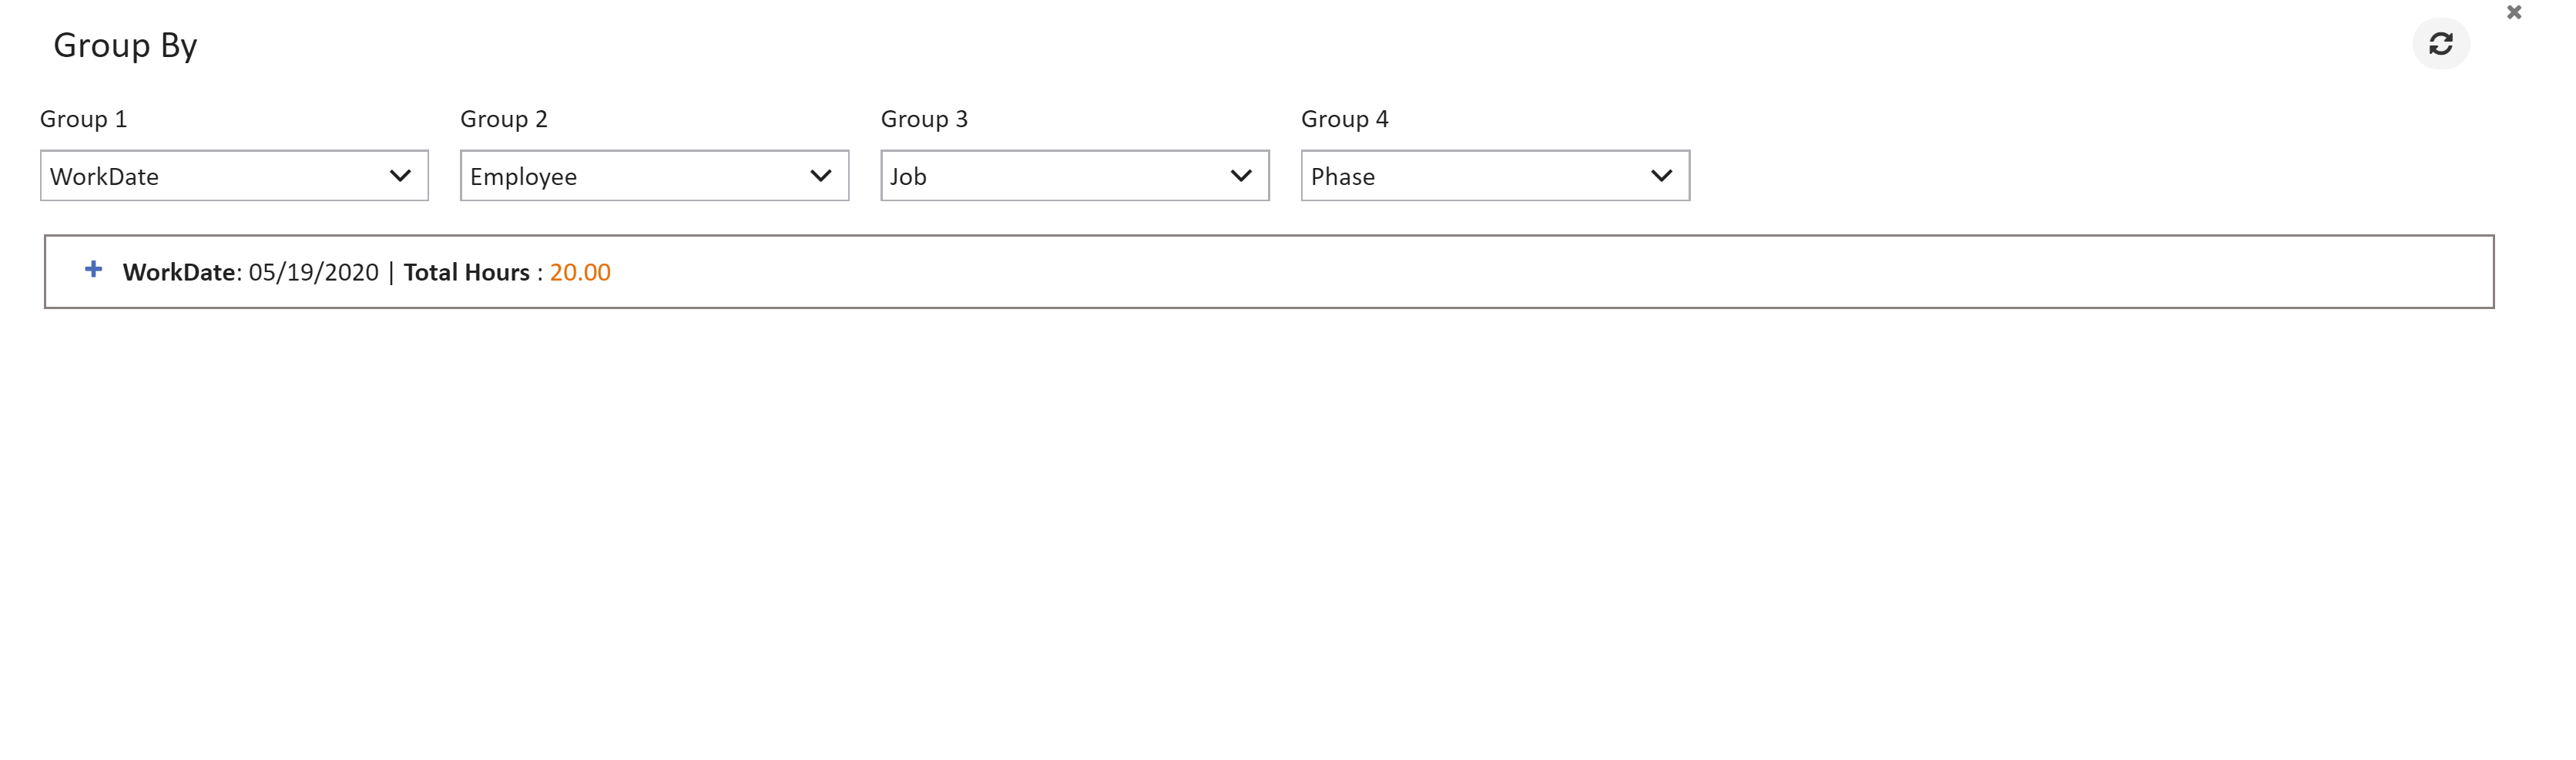
Group - Group option is used to review the timecard worksheets by groups. Four group options are available. Under each field the user can select the value with which they like to group. For instance, the the records can be grouped by work date in Group 1 , by Employee in group 2, by Job in group 3 and by phase in group 4 like shown in the below screen.
|
OT Rules - This option is for performing overtime calculation. When an employee worked for more than 8 hours a day and the hours field in the timecard worksheet shows more than 8 hours then on applying the OT Rules button the record will be split as 8 hrs in one record and apply regular pay as transaction code and for the remaining hours transaction code will be applied as overtime depending on the state. For example, if an employee worked for 10 hrs on a given day, on applying OT Rules the record will be split as 8 hrs with regular pay as one record and 2 hrs with overtime pay as another record.
|
|
Copy – This option will copy the highlighted record and create a new record with the same values which can then be modified as needed. The records can be selected in bulk or individual record and can be copied via right click copy or control+C to copy the selected records anywhere in the timecard worksheet screen.
|
|
Paste - The records can be selected, copied and pasted.
|
|
Right Click Options - Right click on the cells will have options to Insert Row above, Insert row below, Remove row, Undo, Copy, Cut. Using Insert above and below row can be added respectively. Undo option reverts the previous option and cut option is used to cut the records and paste anywhere using the Control+v option.
|
|
Delete – The records can be selected and deleted using delete option on the keyboard or using right click and remove rows.
|
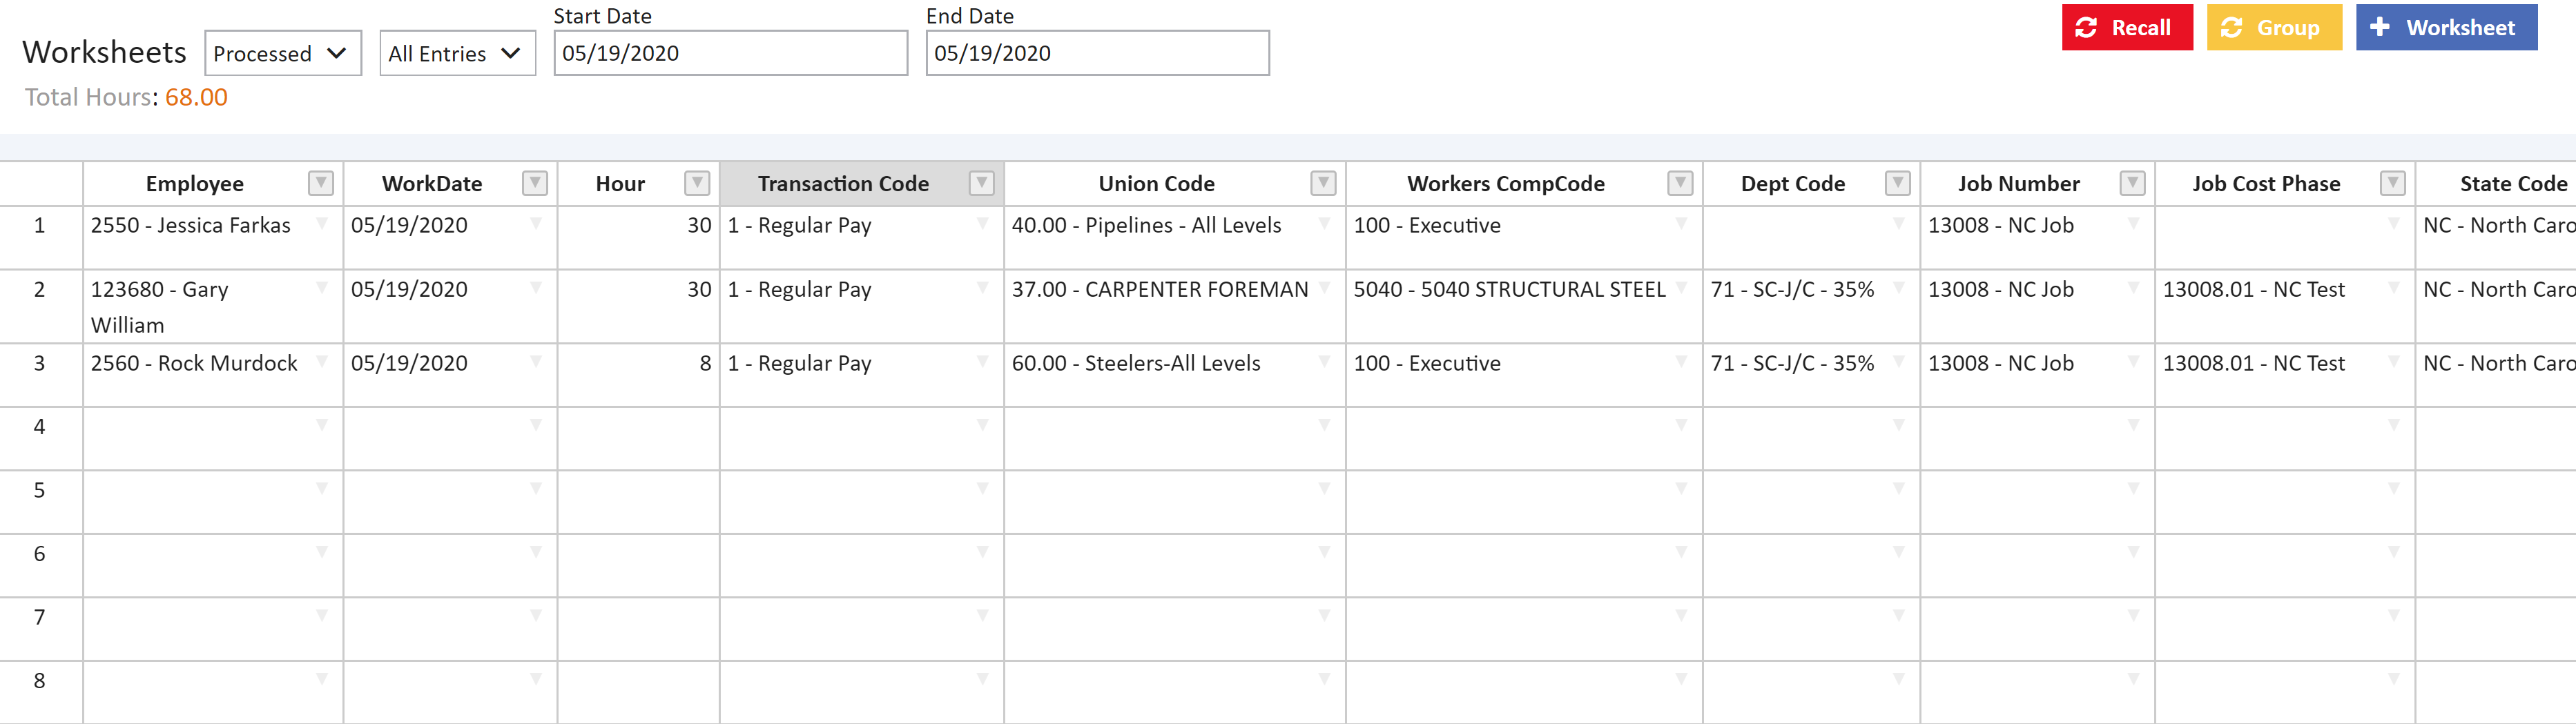
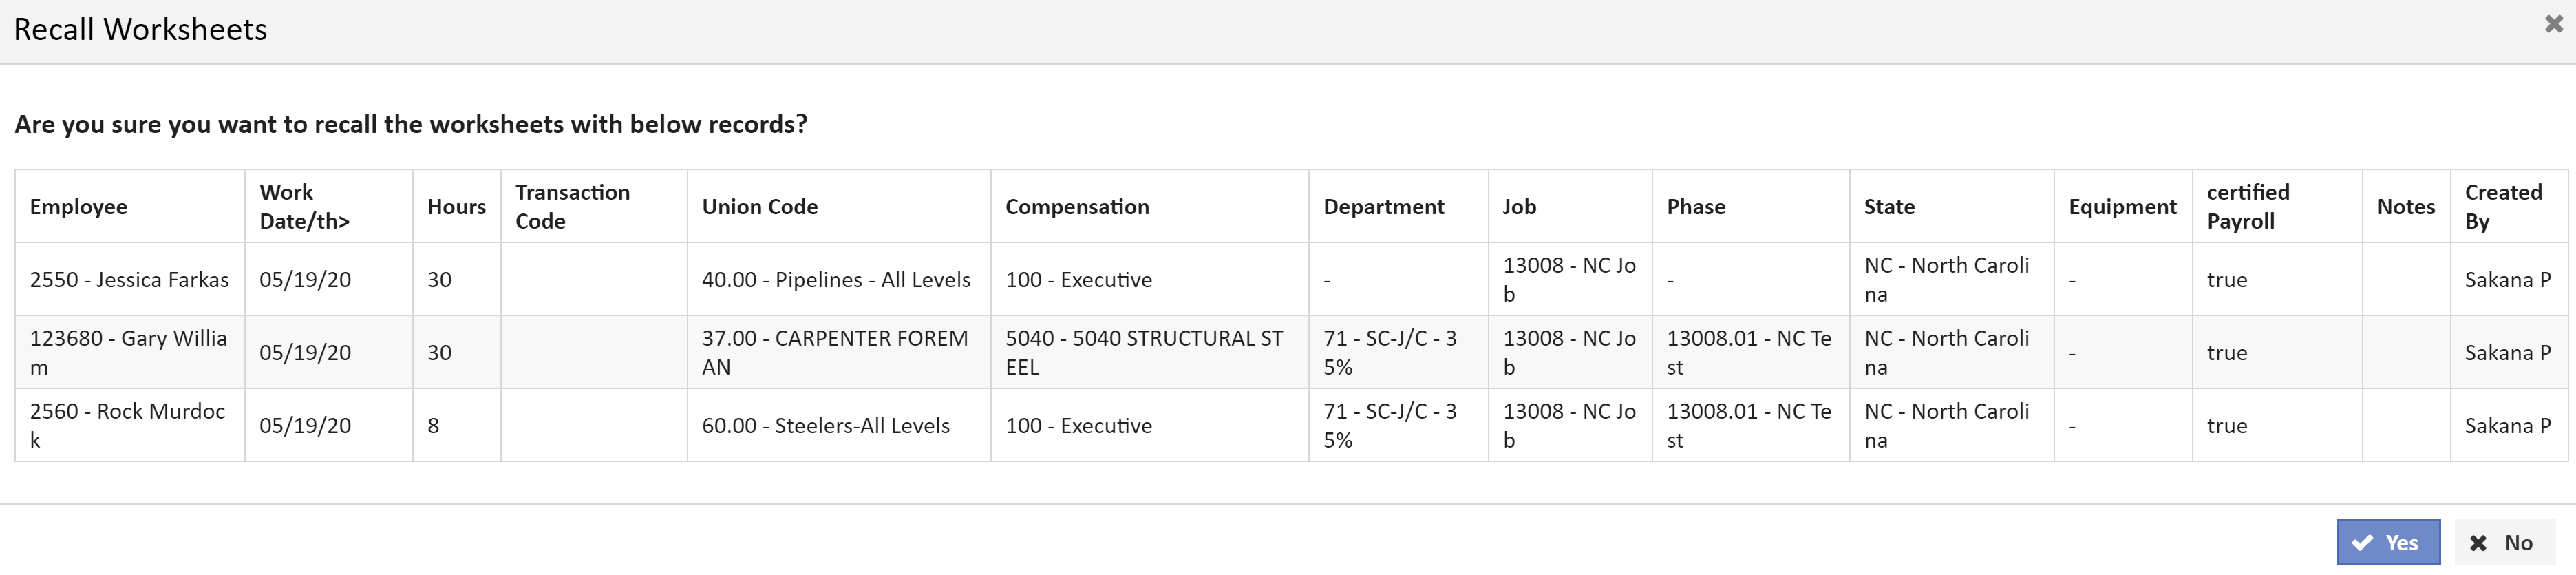
Recall - This option is used to mark a 'processed' time card record as 'open' so it can be modified. Click on the 'Processed' option in the Filter field , all the processed records will be displayed. On Clicking Recall button, all the records which will be recalled would be display for User confirmation. On clicking yes , the processed records will be changed to open and changes can be made.
Data Fields
The following fields may be made visible on the Time Card Worksheets or disabled by checking or unchecking the fields in the Global Settings > Time card Settings > Time card Worksheet Fields.
- Employee - The employee for which the time card needs to be entered can be selected from the employee field drop down. When an employee is selected the union code, workers comp code, dept code fields will automatically be filled if the employee is already configured with those details.
- Work Date - The time card entries should be entered with a date for which the employee worked on.
- Hour - The time card entries should be entered with amount of hours the employee worked on that specific date entered in the work date field or enter the exact start time and end time of the working hours. This settings can be changed in the Global Settings > Time card Settings > Time card Worksheet Fields screen.
- Trans Code - Select from the list of regular pay and overtime pay using the drop down arrow. Any other type of transaction code, such as for Vacation, Holiday or Sick pay, will require that you to enter those transactions through add time card under submit payroll menu.
- Union Code - Select from the list of current union codes using the drop down arrow. to pull in hourly pay rates from the union table. If the time card entry does not fill the Union comp code field automatically, user can select from the drop down.
- Workers Comp Code - Select from the list of workers comp codes using the drop down arrow. If the time card entry does not fill the workers comp code field automatically, user can select from the drop down.
- Dept Code - Select from the list of department codes using the drop down arrow.
- Job Number - Select from the list of current jobs using the drop down arrow. The certified payroll flag will be automatically updated based on the job list setting whenever the job number is changed on a time card entry. This setting will determine if you will pick from the phase master list or the list of phases that are specific to the job.
- Job Cost Phase - Select phases from the master list or from phases that are specific to the job. If the user has been given access to the option, they may change the settings by checking or unchecking the 'Phase from Jobs' option on Time card settings screen. If you select a phase number that has been set up with a Labor Distribution Code , then the non-blank LDC fields will be automatically updated. For example, if you enter time to a phase code that has a workers comp code and union code set up on the LDC phase list, the record will be updated with those values from the LDC record.
- Job Number - Select from the list of current jobs using the drop down arrow. The certified payroll flag will be automatically updated based on the job list setting whenever the job number is changed on a time card entry.
- State Code - This field is only necessary for companies that own the multi-state payroll feature. In most cases, companies that do business in multiple states will set the payroll state code on each job. In this case, do NOT include the state code field on the time card worksheet screen; let the system do the work for you. If you have not set up the payroll state codes on each job (again, this is only necessary if you work in multiple states), then you will need to include the state code field on the worksheet so that the user can identify the proper state; the transaction should reflect the state in which the job is located.
- Equipment - If you own the Equipment system, then you will be able to link a piece of equipment to the time card record.
- Notes - Any comments about that timecard entry can be added to the notes field.
- Created By - This fields displays the name of the user who created the time card.